I love to doing crafts and sewing and coming up with new ideas. I like to see a craft or an idea and tweek it fit what I have invision in my head. I like to share my treasures with others. I make a lot of my crafts to give away but I become emotionally attached to everything I make which is why it is so hard to give them away and I end up making multipules, I can give one away and have one for myself.. Please share your thoughts and ideas with me.
Sunday, April 9, 2017
Teenage Mutant Ninja Turtle rag quilt
This is one of my favorite quilts that I have made. It was done in he memory of my son, Bryan. It was made for Bryan's best friends baby boy. It's made of 8 inch squares. I made the template for the mask. I love the way it turned out
Sunday, September 13, 2015
Payton's quilt
This was such a fun quilt to make. When I picked out the fabric I wasn't sure if y was going to like it. But as usual once it was all done, it's moved up to one of my favorites. This quilt was made for my niece for highschool graduation. I wanted the quilt to reflect her personality, her highschool years and accomplishments. I succeeded.
Payton had Hawaiian Fridays. They would wear Hawaiian shirts on Friday. Payton's was bought at Goodwill. She shopped at Goodwill regularly. Most of the flowered material is Hawaiian shirts from Goodwill. She was in Marching Band all four years of High School I incorporated music note fabric. I chose black material to make the blocks stand out. I asked her mom ask her friends and family to think of one word that describes Payton. I put them on a block of black material. I appliqué d her name out of the Hawaiian shirts. I wanted a quilt pattern that looked spontaneous. I used this site for the idea and directions for the quilt. It turned out so much better than I ever imagined.
Monday, July 21, 2014
Elephant baby quilt
The quilt is 40X45. I used 5 inch squares. The middle piece is 20X25. My husband drew the pattern of the elephant. I drew the pattern for the balloons, the strings are 1/4 inch ribbon.
Wednesday, April 2, 2014
Memory quilt
I had the privedge of making a memory quilt for a young lady whose boyfriend died a few months ago. This quilt took a lot longer and was much harder than I thought it would be. I had never done a quilt like this before. I didn't follow any pattern but pieced the shirt squares together in a pattern that I liked. I used as many shirts as I could. The back was made of his jeans. The wares were 7x7. I tried to use pockets and holes and different part of the jeans. I was surprised at how well it turned out.
Friday, February 7, 2014
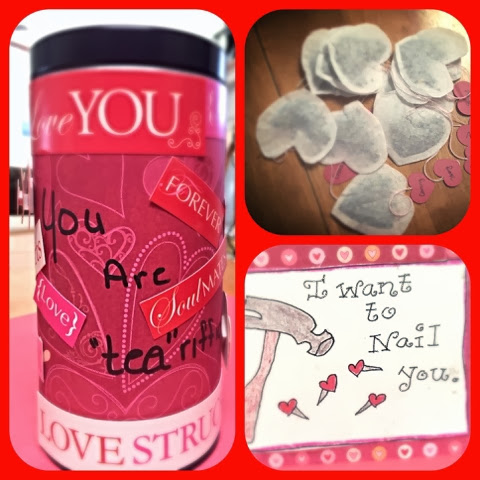
Valentines tea
My husband is the hardest person to get a present for. For Christmas this tear he picked out and bought his own present. I did wrap it put it under the tree. Usually homemade presents are best if I pick something out but that doesn't always work out either.
For Valentines this year I did the usual thinking about it and at the last minute found some inspiration on Pinterest. I decided to buy some loose leaf tea and make tea bags. I bought way too much tea. I probably only needed 1/4 of the tea I bought. For 15 bags you probably only need 1/2-3/4 ounce. I bought 2 ounces. My inspiration cane from here. I free cut each heart. I used my machine to sew them. After filling them with tea I sewed in the string when I filled the hole. The other end of the sting are paper hearts that have a word on each that I think of when I think oh my husband, ie loving, kind, caring etc. I decorated the tea tin the tea came in with decorative paper and stickers. I put the bags in a tin. I put a valentine card on top of the tin. I got the valentine card from Here.
I am goin to give it to him tonight I will let you know how it goes.
Monday, October 21, 2013
Halloween Bags
I got my inspiration for the princess bags here. The Spider-Man bag is my own creation. If I make them again I would change each one a little bit. For the Spider-Man bag I would chand the spiderweb to be more of a pattern. The Snow White bag I would switch the colors and the Cinderella bag I would use all blue to make it look less like Alice in Wonderland.
This was such a fun project.
Wednesday, October 16, 2013
Personalized baby rag quilt
It's been awhile since I have posted on here. When I do a project I forget to take pictures. Today I finished up a rag quilt for a baby shower present. I have made rag quilts before, each one always turns out my favorite when I am done. This one is no different. I love how quick and easy they are. Bonus the people you give it think its a lot more complicated and time consuming. I did my own thing but got advice from two tutorials. This one for the sizing of my strips and this one for the personalization..
I cut my strips 7 inches and 4 inches. I used green flannel in the middle of the strips. I sewed them using a 1/2 inch seam allowance.
Note, when personalizing make sure you trace your letters backwards on the fusible web. I learned the hard way. Also when sewing your quilt together make sure the name is the right or you could have an upside down quilt like mine. The name was suppose to be on the bottom. However I really like the way my mistake turned out. On other note you definitely want to wash the quilt at a laundry mat or have a really good filter on your washer and dryer.
After wash.
I have made a couple more rag quilts using the same technique.
Thursday, February 7, 2013
Carved tree blanket
I had no idea what to get my husband for Valentines Day. I think he is the hardest man to give presents to I know. I started thinking about what I could get my husband right after Christmas. Yes I start stressing for the next holiday as soon as one is over. I decided to make him a throw for chilly nights, we don't like turning on the heat. We do live in Arizona so adding extra layers and snuggling up in blankets. I had seen a couple of quilts on Pinterest that looked like a heart carved in a tree. I liked them but wanted something a little different. I was trying to think how I could get more texture for the bark. Then I remembered the snuggle blanket I made for my niece last year. I decided to try and put the two patterns together.
http://www.blogger.com/blogger.g?blogID=3049302177479265494#editor/target=post;postID=3393413454863348357
http://www.quiltbarn.blogspot.com/2012/01/valentine-tree-carving-quilt.html
The changes that I made was I put two pieces of each color of the flannel together, I cut a square on the bias so my bark went up and down instead of on the diagonal and I didn't cut through all the layers of flannel on each strip. I randomly alternated how many layers I cut through. If I made it again I would use darker flannel for the bottom piece, I think there is a little too much white. Unfortunately I can't get the pictures to come out very well.
Monday, April 16, 2012
towel wrap tutorial
I made this for niece Megan's birthday and then decided to make one for each of my girls for Easter. I thought it would be a great swimsuit cover up and she could use when she goes to camp or college. I got the inspiration from one I had when I was younger but that one was much smaller and didn't cover much. It was a definitely a create as i went kind of project. This is an easy project I got each of them done in an afternoon.
I have never done a tutorial so be patient with me. this too will be a create as I go.
The materials you will need is
1 bath towel ( I bought mine from target for $4.99. Target has a lot of colors to choose from.)
1/2 yard of material
sewing machine
matching thread
scissors or rotary cutter
cutting board
20 inches of 1 1/2 inch wide elastic
6 inches of velcro
First I cut all the tags off my towel.
I cut
2 3 1/2x45 inch strips for the bottom ruffle
2 4x45 inch strip to do a strip on the side of the towel
1 1 1/2X45 strip (to cover ruffle on the under side of the towel)
1 8X10 rectangle (for pocket)
1 8/10 rectangle of light to medium weight iron on interfacing
2 3X8 strips for straps (optional)
First, sew the two strips for the ruffle together like you sew bias strips together.
Put the strips together right sides together in a l shape. Sew where the solid line is inside corner to outside corer) then trip to 1/4 inch or where the dotted line is
Iron the seam to one side and when you get finished it should look like this.
I did a 1/4 inch hem on the bottom of strip and did a gathering stitch 1/2 inch on the top. I gathered the ruffle to the length of the towel from inside hem to inside hem of the towel, pinned to the bottom of the towel. the top of ruffle strip was 1/4 above the hem of the towel. I then sewed the ruffle to the towel, sewing along the hem of the towel.
Then fold and iron the strip in half so raw edges are in the middle. You are going to use this like bias tape down the hem of the short side of what will be the front of the towel towel.You will need to cut the strip to fit the towel The fold of the strip should go down the outside of towel with the edges of the strip on either side of towel. Sew along the hem. pin and sew together making sure you are catching both sides of strip. I don't have pictures of this part it was late at night and I forgot, When I make another wrap like this one I will post a picture,
you will need to sew the two 1 1/2 inch strips together like you did the strips for the ruffle.You will need to iron the bottom strip like you did the side strip.This strip is going to cover the raw edges of the bottom ruffle. the strip should look like the above picture. trim the strip to fit the towel from inside side hem on each side. I pressed a 1/4 inch of the strip an each side so no raw edges would show. place the strip over raw edges of hem aligning the fold with hem pin and sew as close to edge of the fold on both top and bottom.
it will look like this when you are done
The next step is the hardest I think. Find the middle of the top of the towel (back side) find the middle of the elastic and pin together. You are going to stretch the elastic as far as it goes and start sewing from one end to the other stretching the elastic the whole time. Sew as close to the edge of the elastic as possible
I sewed the other side of the elastic doing the same thing but you don't have to.
The next step is figure out where you want you velcro. its a lot easier if you sew the velcro on before you encase your elastic. You want the rough side of the elastic on top front of your towel and soft part of the velcro on 2 1/2 inches on the front of the underneath side of the wrap. I had to do this by trying on the towel to decide where I wanted the velcor. Pin the velcro and sew around all 4 edges.
Now turn over the top of towel 2 inches you will have to stretch and sew so you will have to measure as you go. Again use the hem of you towel be a guide to where you sew.
Iron on the interfacing to your pocket. Iron all sides a 1/2 an inch then turn the top down another 1/2 inch on all sides, clip the corners to the first fold this will give you sharp corners. Determine where you want the pocket and sew it with 1/4 inch seam allowance. I sew it the pocket again staying as close to folded edge as possible. Now you are done unless you want straps.
For the straps fold the straps with right sides together length wise, sew a 1/4 inch seam allowance around 2 of sides, using a dowel or pencil turn right side out. Iron flat to stitch, fold the open end inside a 1/4 inch and top stitch around the open end to close it and the long end to make it lay better. Determine where you want your straps pin and sew them on. Voila your done!!
I made each of them a matching shower cap as well, more as a joke but I think they secretly like them! Right girls?!? If you want to make a shower cap I basically followed the instructions on this websit http://whipup.net/2011/10/20/guest-blogger-series-diy-shower-cap/. I followed them the best that I can follow directions which is basically skim them and do it my way but i think they all turned out very nice, Each one is a little different, Heather's I did a ruffle down the front of the towel. Krystal I had to a bath sheet and I did a triple ruffle down the front to cover a strip in the towel and I put ruffles around her pocket.
Megan as soon as you send me a picture of you modeling your towel wrap I will add you instead of 2 of Heather.
Thursday, March 8, 2012
kitchen set
This year I decided to try to most of my presents for this year. My sister's birthday was in February. I had a hard time coming up for someting for her. I decided to make her a kitchen set. Some hanging dish towels, a casserole tote and some hotpads. This was a trial on the patterns and I tried to follow them as close as the tutorial as possible. I will make some changes the next time I make most of the patterns but all in all I think they all turned out pretty well. I used different web sites and will list each one for you under the pictures.
Casserole tote
http://cackleberrycottage.blogspot.com/2009/07/casserole-tote-tutorial.html I quilted my own fabric and turcked the corners to fit a bigger pan in it.
Double hot pad
hot pads
http://www.aprettycoollife.com/2010/02/polka-dot-pot-holder.html
Hanging dish towels
http://treyandlucy.blogspot.com/2010/12/tie-on-dish-towels.ht
Casserole tote
http://cackleberrycottage.blogspot.com/2009/07/casserole-tote-tutorial.html I quilted my own fabric and turcked the corners to fit a bigger pan in it.
Double hot pad
I keep mine square
http://www.aprettycoollife.com/2010/02/polka-dot-pot-holder.html
Hanging dish towels
http://treyandlucy.blogspot.com/2010/12/tie-on-dish-towels.ht
Monday, February 20, 2012
Snuggle blanke
I made this blanket for a graduation present. I saw the idea on pitrest and love the look of the blanke. However that blanket was made for a todler so I had to come up with an idea for a bigger blanket. I came up with the design for the front of the blanket, sewed the design together and then followed the instructions on http://lilmoptop.blogspot.com/2010/12/cozy-flannel-blanket-tutorial.html. This project is very tedious and took longer than I expected but I absolutely love the finished product.
Subscribe to:
Posts (Atom)